Creating interactions in a video
In the “Appearance” widget, if no interaction has yet been created, click on “Add interaction”.
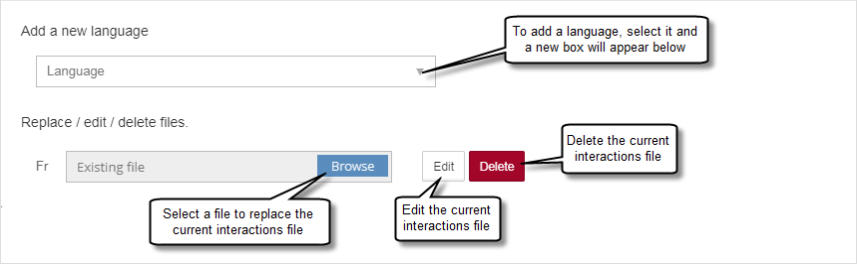
To create an interaction in a new language, or to modify an existing one, click on “Edit”.
A pop-up window appears, asking you to select the language of the interaction to be created or modified. Languages are listed in English.
If you select a language for which no interaction exists, you will start with an empty interaction list.
If you wish to translate a previously created interaction, simply select it, translate the texts and save the interaction in the target language.
Once in the interaction interface :
To add an interaction, simply move around the video, stop it at the start of the interaction, then enter the text and click on the “Add interaction” button, below the video.
The default duration of an interaction is 3 seconds, but you can modify it.
There are two ways of specifying a different duration:
- you can manually change the interaction end time,
- you can use the lock:
- pause the video at the point where the interaction is to start
- click on the padlock to lock it. The start time is grayed out
- restart the video, then stop at the point where the interaction is to end
- when you confirm, the interaction will be perfectly adjusted to the limits you set
Interactions are applied to areas that usually, but not always, contain text. The entire interaction area is clickable.
The interaction can be positioned and resized within the video. It can then be associated with an action
Entering an interaction title is mandatory. Without a title, the interaction cannot be validated.
The video can be paused automatically when playback reaches the interaction start timecode. To do this, activate pause.
Entering textual content is not mandatory. If the interaction contains text, it can be formatted; the options are …
- bold
- italic
- strikethrough
- text color
- text background color
- size
- horizontal alignment
An action can be applied to the interaction. The 4 possible types of action are:
- No action !
- Hyperlink = opens an Internet link in a new tab or as a replacement for the video, depending on the option chosen.
- Move then play = move within the video to the indicated timecode, then resume playback
- Move then pause = move within the video to the indicated timecode, then pause playback
An interaction can include only one action.
The border around the clickable zone of the interaction can be hidden.
The interaction background color can be chosen by entering its code or selecting it from a palette.
The opacity of the interaction zone can be adjusted, from 0 (transparent) to 100 (opaque).
To create an invisible clickable zone (a “hotspot”), simply enter no content, hide the frame and make the background transparent. When you hover over the zone, the cursor changes shape to indicate that an action is possible.
One interaction must be validated to move on to the next.
The order in which interactions are created is not important. They are automatically reordered according to their start time.
- By clicking on “Modify” in the list of existing interactions, the video is positioned over them and you can directly modify the information.
- Click on “Duplicate” to create an exact copy of an interaction.
- Clicking on “Delete” deletes an interaction.
To save changes made to interactions, confirm the language selected, or select a new language if a translation has been made, then click on “Validate”.
If a new language has been selected, new interactions will be created in the new language, and those in the original language will not be modified.
A few typical interaction use cases:
Create a fixed menu, like on a DVD
At the moment (timecode) when you want the menu to appear, create an interaction that simply pauses the video, possibly with the display of a title.
Create a first button with the same timecode as the title of the first chapter. Position and format it. Give it the action of going to the timecode of the first chapter when playback resumes.
Duplicate the first button, replace the title with that of the second chapter and position it. Set it to go to the timecode of the second chapter when resuming playback. Etc.
Create a title or credits
At the timecode where you want the title to appear, create an interaction containing your text, which you format. Do not apply any action to it.
For credits, duplicate the interaction, modify the text and shift it in time, then repeat the operation.
Create a hotspot
For example, in a sequence with a relatively fixed framing, you can create transparent clickable zones around objects, logos or characters, to open web links or move around the video.
Create an interactive “escape game” video…
Your video should be a collection of sequences featuring different locations and situations.
Locate the start time code for each segment.
At the end timecode of each scene, create an interaction to pause the video, then as many interactions as there are choices to propose. These choices can be hotspots (a click on a door or a character, for example) or proposed answers to questions. Each interaction links to a different part of the video.
The aim is to reach the sequence containing the exit!
A few tips
It’s easy to turn a Powerpoint presentation into an interactive video. Simply identify the objects you want to make clickable and save the presentation as a video. Use the interaction editor to create “hotspots” (clickable zones) around the objects, texts and buttons shown in the image.
Example
The following example has already been presented in an article on the streamlike.fr blog. It concerns the briefing for a sailing race: