In these times of health crisis, containment is the rule and meetings have become impossible. Working from home and videoconferencing are becoming widespread, at least in those professions that allow it. When it comes to getting a message across to a large number of people or to continue to deliver a service in remote mode, live streaming or simulcasting are interesting options and very easy to implement with the means on board, as we will show you.
That said, before going live, always ask yourself if it’s really necessary and if recording and broadcasting your video on a delayed basis (A.K.A. simulcasting) wouldn’t be enough. As a matter of principle, a live show is subject to random events, unlike the broadcasting of a recorded program.
A live broadcast is justified when there is an expectation (a press release, an announcement, a verdict, a score, a result…) or when you want to follow or monitor a situation taking place elsewhere (conference, debate, traffic, weather…). In the other cases, a delayed or false live broadcast eliminates all the risks and complexities of a real live broadcast.
We will therefore see how to make a live broadcast, but also what the alternatives are.
What you need for a (true) live broadcast
On the hardware side, you need to film (the video source), capture the sound (the audio source), encode these sources (via an encoder) to send an “RTMP” stream to the server that will broadcast your program.
The video source
At the simplest, the video source can be the webcam on your PC (or connected to your PC via the USB port) or the camera on your phone.
If you have a box that allows HDMI signal encoding, such as those that allow you to share video game games on platforms like Twitch, you can use it to connect a camcorder to it.
In any case, put/fix your camera or your phone and prefer a horizontal orientation, which will allow for example to watch your live broadcast on a PC screen or on the TV in the living room with a Chromecast box.
The audio source
At the simplest, you will use the camera’s microphone. Ideally, you will bring a microphone close to the scene being filmed or to the person speaking. You can use a headset with a microphone or a hands-free kit if you are filming with a telephone.
Depending on your device, plug the microphone into the microphone jack of your PC or phone.
The encoder
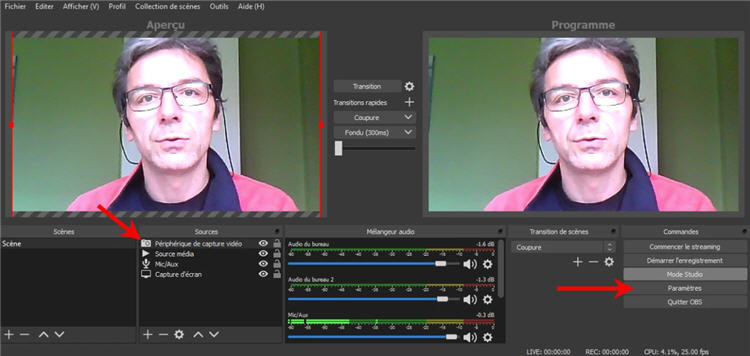
At the simplest, it will be your PC, on which you will have installed a free and very powerful software: OBS Studio. There are many online tutorials on how to use it, but we will summarize the essentials.
If you broadcast from a phone, you will have to install the (on Google Play or in the App Store).
If you’re using an HDMI capture device, the encoder is usually built-in and if it’s connected to the network, you just need to set it up.
Setting the broadcast parameters
Measuring your upload bandwidth
You should start by measuring the upload speed of the internet connection you are going to use, for example by going to www.speedtest.net. Here is an example of a result. The important figure is the upload speed:

This bit rate determines the quality of your encoding.
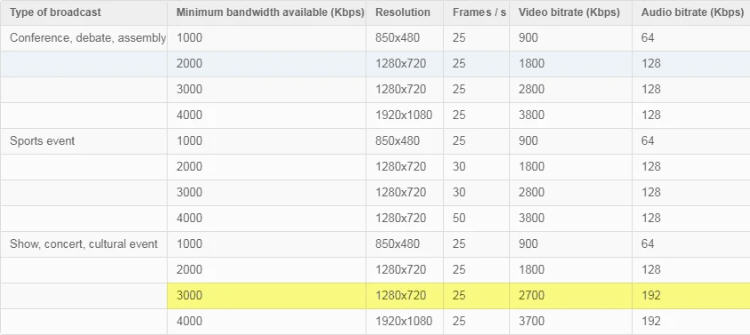
Encoding parameters (resolution, audio and video bitrates, number of frames/s)
Your available upload bandwidth must be about 50% higher than the quality of your encoding, bearing in mind that it is useless to encode at more than 4Mbps and that with less than 1Mbps, you will not be able to achieve a broadcast of correct quality.
In the previous example, I can encode at 4Mbps because I have much more than 6Mbps in upload bandwidth (I have 39Mbps).
The video and audio bitrates you choose will depend on the nature of your program and your available upload bandwidth.
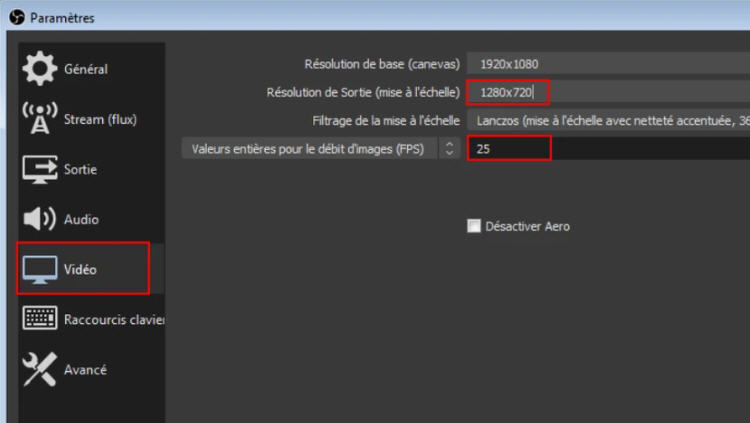
For example, if you want to broadcast a fitness session and if you have at least 4.5Mbps in upload bandwidth, you can serenely broadcast at 3Mbps (3000Kbps). You will then encode your video in 1280×720 pixels, at 25 fps, at a video rate of 2700Kbps and an audio rate of 192Kbps (values highlighted below).
Encoder set up
Of course, before adjusting the settings, make sure you have selected and activated your audio and video sources.
All encoders work the same, whether you use OBS Studio, GoCoder or the encoder of a capture box. You will need to tell it the values for resolution, audio and video bitrates, number of frames/s that you have determined in the previous paragraph.
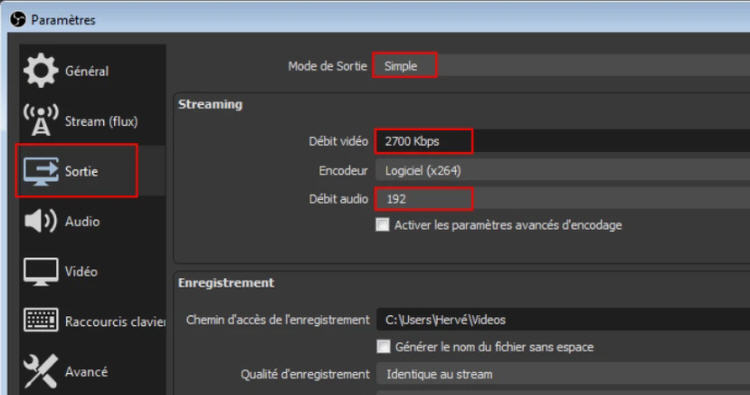
You must also indicate the address of the server to which you will send the stream nd a unique identifier that has been communicated to you.
Once you have defined your settings, don’t forget to apply them.
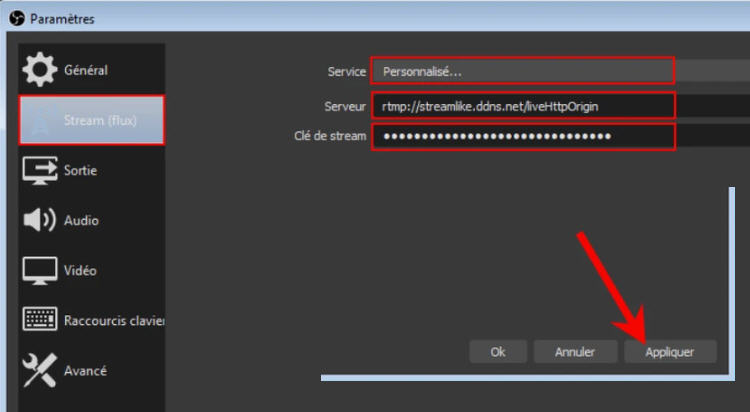
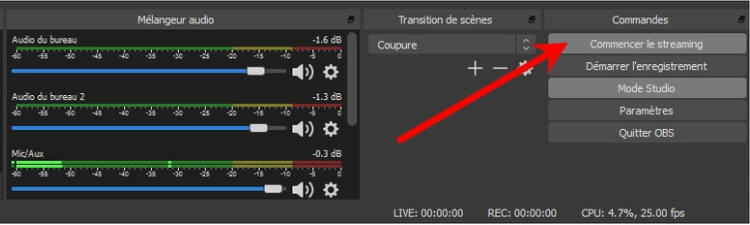
You can then “start streaming”.
Monitoring the broadcast
Along with your stream ID, you received the video player integration code to embed the live stream into your website, as well as a link to share in Facebook, by email, instant messaging, SMS, etc…
The link obviously allows you to monitor the video and audio of you broadcast. Note that you must expect a delay of 5 to 30 seconds between what the live action and what internet users see. A live broadcast is not a video conference!
How to create a fake live broadcast
A fake live broadcast (or simulcast) consists of broadcasting a pre-recorded programme at a specific time. This avoids all the hazards of a real live broadcast: a network cut, a dog barking, a person entering the room, a phone ringing…
The “true”, fake live broadcast
It’s very simple: you do a true live broadcast but you select a recorded video as the source, instead of your camera. With OBS, it’s very easy to choose what to broadcast.
StreamOuts
This is a Streamlike specific solution, described, described on our website. It consists in defining when you will start a video or a video sequence that everyone will see at the same time, on all devices (PC, tablet, smartphone, TV connected via Chromecast).
To take the example of the fitness session, you can create an image that advertizes the time of the session and will be displayed until the start of the broadcast, then another image that gives an advertizes the next session and will be displayed at the end of the broadcast.
Example of the simulcast of a press conference on Saturday, March 21 at 3:00 p.m.
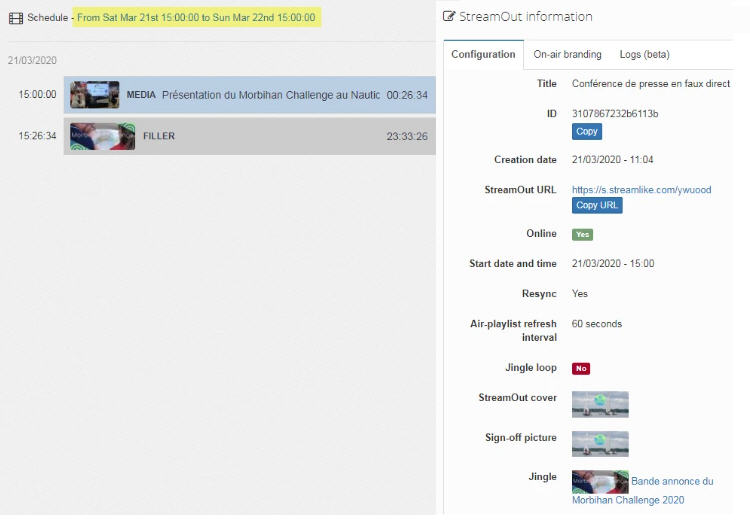
StreamOut integrates into a web page like a normal video player and its URL can be shared on social networks.
Securing live broadcasts and simulcasts
Even without setting up access control, your feeds will never be downloadable.
You can easily restrict access to a real live stream or a StreamOut. All you have to do is associate them to a domain or a page, which will be the only ones authorized to display the stream. If the access to the page is secured, you will need an account or a password to access it.
Different security strategies are possible. Do not hesitate to consult us on this subject.